Saturday, December 26, 2009

Christmas Photos

I'll begin, once again with photos of that sad, old house, just outside of Dundalk Ontario, near the highway that continues to lure me to it with my camera. I'm amazed it hasn't fallen down yet. I saw many other tire tracks in the snow, so I know there are quite a few other hobby-photographers like me who feel the same way.

On a happier note, here's a shot of my step niece, Ellen, with the family cat, Sean. That's right. The cat is named Sean!

Sean decided to take over the Monopoly game at one point, acquiring both Boardwalk and Park Place, thus declaring himself the overall winner.

Tuesday, December 15, 2009

My 2009 Gingerbread House

Okay, I'm not going to go through ALL the steps, but here I have traced around the cardboard templates I made into the dough. This dough was about 1/4 of an inch thick.

For the tiny houses, I made the dough as thin as I could, roughly 1/8 of an inch, maybe even 1/16th. I cut around the paper templates and baked it for less time than the regular dough. I saved this step until all the regular sized pieces were baked, in case I didn't have enough dough.

Here are the tiny ones baked.

Here are some of the regular sized pieces baked and cooling.

Before assembly, I knew I wanted to try lighting the house from within, so I rigged up a couple of bright LEDs to a battery pack with a switch that could be hidden behind the house.

Now my least favorite part...assembly. I have the worst luck with Royal Icing. I found a good recipe, but I think I should have added more icing sugar. It finally set up hard enough, but I had to support the sides for hours with jars and bottles!

At long last, it was finished! You can see the other tiny one I made to the left. Making the tiny ones gave me something to do while waiting for the large one's icing to set.
I call this my least favorite part because you can't start decorating until the roof and walls are secure....and they seemed to take forever to solidify.

Here is a shot of the battery pack behind the house.

The lights are ON....and for some weird reason, the yellow "fruit-roll-ups" I used to make the window panes show up as green! The LEDs must have a strange effect on them.

Oh well, not bad for the first one I've done in about 10 years. I'll have to make them on a more regular basis to perfect my Royal Icing making skills.

Tiny Gingerbread House

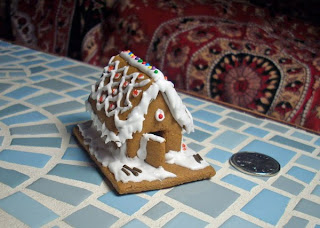
I did it again! I made a tiny Gingerbread house...much better than the last one! This time I put a quarter near it for scale.

Front View
3/4 View
Back View

Friday, December 11, 2009

Gingerbread Houses

I haven't made a Gingerbread House for several years, but I plan on doing one this year. This is one I did back in 1997. I noticed, after Googling "Gingerbread Houses" images, that a lot of people don't use "Smarties" to decorate the roof......but in local bakeries, they're a standard ingredient! I guess this is because I live in Canada and most images on the web must be from U.S. bakers. I didn't realize that "Smarties" aren't the same in the States as they are here. Our "Smarties" are originally British and are similar to plain "M&Ms". Anyway, I always like to use them as pictured here to decorate the roofs of my Gingerbread Houses.

This is the tiniest Gingerbread House I ever made. I put it in a doll's house one Christmas for my children. This was probably 2001. Anyway, the little thing got destroyed by my curious daughter several months later who wanted to eat it! It was completely edible, so no harm done.


This year I'd really like to try it again, only this time use coloured sprinkles and such to decorate it! I rolled the dough REALLY thin and used a paper template. I also baked it for less time than regular thickness gingerbread. It turned out quite crispy!

Thursday, November 5, 2009

My Very Own TARDIS!

Many years ago......maybe 20 or so, an old boyfriend built me a balsa wood TARDIS. It stood about 12 inches tall and I thought it was great. I moved a lot, so I often worried it would get wrecked being packed up in a box all the time, so I gave it away to a co-worker who was working on developing a possible Dr. Who animated series. It never came to be....and I regretted losing such a unique handmade item.

To make a long story short, I recently reconnected with this past boyfriend and told him how I regretted losing my old TARDIS. Well, he surprised me just a few weeks ago with the news that he was building me a new one! This one is larger and built from birch plywood, so it's stronger.He put such great detail into it! Both front doors open and it has a night-light on top with a light sensor so it lights up at night!

Here's a photo without the use of my camera flash.

Here's a detail shot of the handmade door handle and keyhole with a swing away cover! He even went to the trouble of printing out the notice on the telephone door...which the old one never had! This TARDIS stands approximately two feet tall. I will keep this one for the rest of my life.
It's a one-of-a-kind built just for me by a very dear friend.

Sunday, November 1, 2009

Maeve the Mouse

My daughter wanted a very specific costume this year...a white mouse! Since she's 8 and too big for a Toddler's costume, I had to make it without a pattern. Her brother is showing off the ears!


I had to deliver it to her at the mall we go to when I visit, so she modelled it near the women's restroom. I thought she'd at least come out into the mall so we wouldn't have this white tile background....but she suddenly became too shy.

I asked her to show off the tail here, but you can't see it very well.
She liked having me draw her nose and whiskers with good ol' lipstick and eyeliner pencil.

Hallowe'en 2009

Anyone who loves Hallowe'en as much as I do knows that it's a hectic day for us decorators! I didn't begin my set-up until 3:00 in the afternoon! I had to run to Home Depot for wooden stakes and last minute items. Also, I had to go to Future Shop to get some small speakers for my portable CD player so I could have the church organ music outside!

After all that, I took advantage of a fallen limb from last week's wind storm. It was perfect for my owl to sit on.
I then proceeded to attach my newly made Grim Reaper to a wooden stake so he would stand taller than his previous 5 ft height...which would have looked silly.
I had to quickly sew his robe onto his body after I got him into place. It was also very windy and I had to wire the scythe into place so it wouldn't be whipped around.
My previous plan of setting up the Grim Reaper's left hand to be pointing outward had to be abandoned for this year. I just had to let it hang down at his side.

Here I am at approx 6:10 PM as the sun was setting. I hadn't had any time to do any make-up on myself, so I was a very bland looking witch.

The Grim Reaper still has his blinking red LED eyes that I'd put in him when he started out as one of my first props a couple years ago.... just a skull on a stick. (scroll to the very bottom)

I was thrilled at how well the owl turned out! Amazing what you can do with some very simple items. I got the lantern at a thrift shop and followed instructions from the internet on removing the wick and other parts from it and replacing them with a flickering flame bulb. (I just checked and the website seems to have been removed)...so I'm glad I did it already!

And here's my Reaper again.
I had many comments on the fake fire beneath the cauldron. One boy said, "You're burning all the candies!" (because the cauldron ended up being my candy holder....because I couldn't get a hold of any dry ice to put in it)

And here are a couple photos of some Trick or Treaters. I noticed tigers were a popular costume this year.

Because it was quite chilly, a lot of kids had to wear winter jackets over their costumes!

You can watch a video below to get a better feel of the ambience of my display. Unfortunately, it's quite dark, but you'll get the gist of it. A lot of kids said my display was great and they loved it! I think subtlety is better than those big inflatable ghosts that say "BOO" on them or too many disconnected props that have no other unifying theme to them except for the fact that they were in the Walmart Seasonal Department together. (I guess I shouldn't "dis" my neighbours, but that's what they did to their houses)

Hallowe'en 2009 Video

Saturday, October 24, 2009

Creative Ideas Are In The Consciousness

Walking along Queen Sreet last night I came across this window display. Well, well, well....isn't that interesting? They had two owls done this way, and two coyotes as well! I didn't think you could get plastic coyote decoys. I found it interesting that they would paint everything black.
Even the tree stumps were painted black.
Anyway...I thought it was quite interesting to see that someone else had the same thought to light up the eyes of owl decoys!

Monday, October 19, 2009

Papier Maché

Here's a turtle I had to make in 4 days!
First day:

Second day:

Third day:


Fourth day:


Finished and ready to be delivered!

Tuesday, October 13, 2009

An Arm and A Scythe

These aren't finished, but here's one arm for my Grim Reaper...(sitting beside the half finished cauldron)

And this is the scythe that the Grim Reaper will be holding in his right hand.

Thursday, October 8, 2009

Plastic Dollar Store Skull Transformation

I only buy these cheap plastic skulls because they're easy to transform into something more interesting. I repainted this one and cut a hole through it to allow the wires of an other dollar store product...the LED flicker light to go through and become a burning candle on top.
I had to "hack" the LED light to lengthen the wires. It was so easy, a child can do it. All they need to know is red from black and how to use wire strippers. Easy.

Click HERE for a link that goes into more detail.

Monday, October 5, 2009

More Hallowe'en Stuff

Yes, when I'm unemployed I keep myself busy with hobbies....and for some strange reason I often seem to be out of work around Hallowe'en. Hmmm. Strange...but anyway, here's the owl decoy BEFORE:

And AFTER:

It's going to be dark out so I exaggerated the markings a bit.

And here's a new project...the CAULDRON! I had a big plastic outdoor planter that was just the right size. I drew a template for the curves of the cauldron, made a whole bunch more out of cardboard and attached them with latex caulking. (I decided to use it because the masking tape wasn't working too great and I just happened to have some left-over caulking lying around the house)

I began to papier maché over the cardboard and now it's starting to look really cool. I'll post more photos as I progress.